
Read lid opening, upper-lid structure, outer-corner tilt, and inner-corner spacing as separate photo observations instead of forcing one label. Open the detector
eye shape detector
An eye shape detector should separate four visible features instead of forcing one label: the opening of the palpebral fissure, the upper-lid structure, the outer-corner tilt, and the space between the inner corners. Use a straight-on, eye-level photo with relaxed eyelids and no lashes or lenses covering the edges. Record each axis as clear, uncertain, or unresolved. A mixed result is valid, and a photo that hides the corners cannot support a confident eye-shape label.
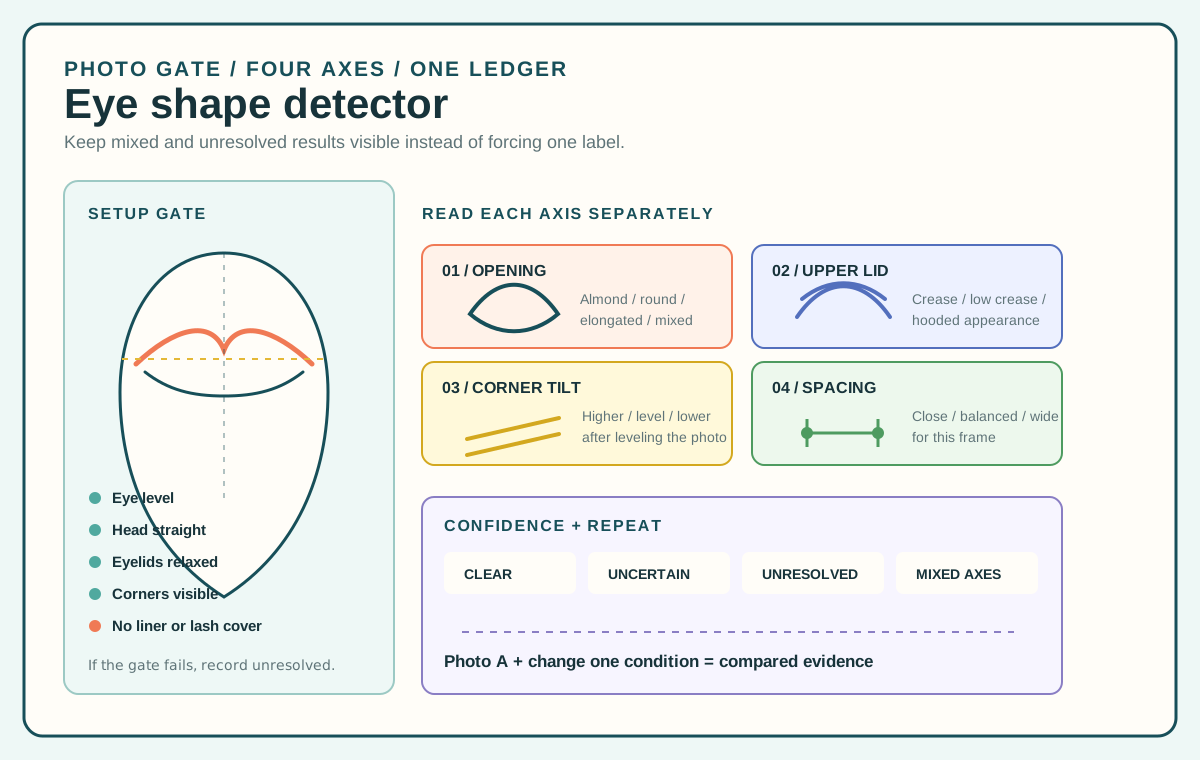
Pass the photo gate before naming a shape
The camera setup changes this test more than most face-reading pages. A tilted chin changes the visible lid opening. A low camera exposes more upper lid. A close lens enlarges the center of the face. Black eyeliner can extend a corner, while false lashes can hide the lid margin. Even a small head turn can make one eye look shorter than the other.
Use this setup gate:
- Head: face the camera with the nose and both ears as close to symmetric as the photo allows.
- Camera: place the lens at eye level and keep the phone vertical rather than tilted upward or downward.
- Expression: look at the lens, keep the forehead quiet, and let the eyelids rest without squinting or widening the eyes.
- Light: use soft front light. Avoid a window or lamp that brightens only one side.
- Visibility: remove glasses, keep hair out of the eye area, and avoid eyeliner wings, colored lenses, or false lashes when the goal is to read your natural lid and corner positions.
- Frame: leave a little space above the brows and below the eyes so neither side is cropped.
The gate passes only when both inner corners, both outer corners, the upper lid margin, and the lower lid margin are visible on each side. If one side is shadowed or turned away, label that side unresolved rather than averaging it with the clearer side.
Read one axis at a time
A common mistake is choosing almond, round, hooded, upturned, or wide-set before deciding which evidence belongs to which word. Those words describe different axes. For example, an eye can have a narrow horizontal opening, a visible crease, and a level outer corner at the same time. Compressing those observations into one label loses the information that made the label useful.
Use this four-axis order:
| Axis | What to inspect | What not to use as evidence |
|---|---|---|
| Opening shape | The open space between the upper and lower lid margins | Makeup wings, eyeliner thickness, or a squint |
| Upper-lid structure | The resting crease, fold, and amount of visible lid between lashes and brow | A raised brow or a tightly closed eye |
| Outer-corner tilt | The outer corner position relative to the inner corner after the head is level | The direction of a lash extension or the tail of a liner |
| Inner-corner spacing | The distance between the two inner corners compared with visible face width in the same photo | Face width cropped unevenly or perspective from a close lens |
Keep one row for each axis. Do not let a strong feature, such as a deep crease, decide the opening shape as well. Each row needs its own evidence and its own confidence mark.
Axis 1: describe the lid opening
Look at the unmarked shape between the upper and lower lid margins. Imagine a line joining the inner and outer corners, then inspect how the lid margins travel away from that line.
- Almond-like: the opening tapers at both ends and the upper lid rises to a gentle central peak before descending toward the outer corner.
- Round-like: the opening stays relatively tall through the center and tapers less sharply at the corners.
- Elongated or narrow: the horizontal opening is visually stronger than the vertical opening, with less exposed lid height around the pupil.
- Mixed: the two eyes differ, or one end tapers while the other remains open.
The useful record is not just the word. Write which landmarks support it. For example: "Both corners visible; central opening taller than the corner zones; result stayed after lowering the camera by one step." That sentence can be inspected again.
Axis 2: read the upper lid at rest
Keep the brows relaxed and look straight ahead. Compare three visible zones on each side: the lid margin along the lashes, the crease if one is present, and the skin between the crease and the brow.
- Visible crease: a fold is visible above the lid margin while the eye is open.
- Low or partial crease: the fold appears only across part of the lid or sits close to the lashes.
- No visible crease in this photo: the lid surface between lashes and brow does not show a distinct resting fold.
- Hooded appearance: skin from above the crease or brow region covers part of the moving lid or crease.
These descriptions can overlap. "Hooded" is not a substitute for every no-crease result. A low camera angle, raised brow, eyelid swelling, or makeup can create the appearance of a fold or hide one. If the upper lid changes when you relax the brow, discard the brow-raised frame and use the resting frame.
Axis 3: measure outer-corner direction
Level the image using the pupils, the inner corners, or a horizontal guide through the center of both eyes. Do not level by the hairline: hairline position is not a reliable camera-horizontal reference in every portrait.
After leveling, compare the vertical position of each outer corner with its own inner corner. Record the direction separately for the left and right eye:
- Outer corner higher: the outer corner sits above the inner corner in the leveled photo.
- Level: the corners sit at nearly the same image height.
- Outer corner lower: the outer corner sits below the inner corner in the leveled photo.
- Undetermined: the head is rotated, the reference line is tilted, or a corner is obscured.
A practical pixel check is:
```text
Outer-corner offset = inner-corner vertical position - outer-corner vertical position
```
In this formula, a positive result means the outer corner is above the inner corner when image coordinates increase downward. The number describes only this photo. It is not a medical angle measurement, and it should not be converted into a universal attractiveness score.
Axis 4: compare inner-corner spacing in context
The space between the inner corners can look wide or close depending on face width, camera distance, and the shape of the nose bridge. Measure it in the same image as face width instead of judging the gap alone.
Mark the two inner corners and the widest visible face line. Then compare the gap with that same face width:
```text
Spacing share = inner-corner distance / visible face width
```
Call the observation relatively close, balanced for this frame, or relatively wide for this frame. Keep the phrase "for this frame" attached. Without population-specific reference data and a standardized camera, a single percentage cannot establish a universal category.
Also inspect the nose bridge and inner-corner fold. Skin that covers the inner corner can move the apparent endpoint inward or outward. Record the visible endpoint consistently on both sides instead of choosing the point that makes the result look more even.
Turn observations into a four-part result
The strongest result is a sentence with four parts, not one dramatic label:
```text
Opening: almond-like
Upper lid: visible low crease
Corner direction: level right / slightly higher left
Spacing: balanced for this frame
Confidence: corner tilt uncertain because the head was turned
```
That format shows what was read and what was not. It also allows a mixed result such as "round-like opening with a level tilt and a visible crease." Mixed does not mean the detector failed. It means one word cannot carry four independent observations.
Do not move landmarks to make the left and right eyes match. Eyes often differ slightly, and a test that erases those differences is not more accurate. Keep each side visible and state whether the difference repeated in a second clean photo.
Know when eye-shape detection should stop
Some photos cannot support an eye-shape result:
- The eyes are closed, mid-blink, squinting, or deliberately widened.
- The camera looks down or up enough to change visible lid height.
- The face is turned so one outer corner is foreshortened.
- Hair, glasses, a hand, or a crop hides a corner or lid margin.
- A filter changes the eye outline, skin texture, or apparent iris size.
- Colored lenses or heavy lashes cover the natural lid margin.
- The left and right axes disagree in a way that does not repeat after one clean retake.
Mark the result unresolved in those cases. An unresolved result is more accurate than a confident label built on hidden landmarks.
Stop using this cosmetic photo exercise if an eyelid change is sudden, painful, swollen, inflamed, or accompanied by vision changes, double vision, weakness, or difficulty closing the eye. Those findings need appropriate professional assessment; a web page cannot determine their cause.
Repeat the photo with one controlled change
A retake is useful only when you know what changed. Choose one correction:
- Raise the camera from below eye level to true eye level.
- Turn the head until the nose points toward the lens.
- Relax a raised brow without changing the camera.
- Remove a liner wing or one eye-covering strand of hair.
- Move from side light to even front light.
Keep both photos and compare the same four axes. If the opening and tilt remain stable, the observation is repeatable. If they change after the camera correction, label the first result photo-sensitive. If the corners cannot be identified in either image, keep it unresolved.
Continue with related face tools
Use the [face shape detector](/face-shape-detector) when the wider question is face length, width, and jaw pattern. The [face symmetry test](/face-symmetry-test) compares corresponding features without assigning a cause, while the [facial thirds test](/facial-thirds-test) follows a vertical landmark chain. If the eye question is part of a color and makeup decision, keep it separate from the [color analysis quiz](/color-analysis-quiz) and [blush placement](/blush-placement) pages.
Eye shape detector questions
Can one photo identify my eye shape?
One clean photo can support a provisional four-axis observation. It is not enough for a confident result if the head is turned, the camera angle changes the lid height, or makeup obscures a corner. Use a second photo with one controlled correction before treating the pattern as repeatable.
What is the difference between almond and round eyes?
Almond-like refers mainly to an opening that tapers at both corners and rises toward a central peak. Round-like refers mainly to a taller central opening that tapers less at the corners. Upper-lid structure and corner tilt are separate axes and should not be folded into either word.
Does a hooded eyelid mean the same thing as a monolid?
No. A hooded appearance describes skin covering or crowding the crease or moving lid in a particular view. A no-crease result describes the absence of a distinct visible fold. The terms can overlap in casual use, but this test keeps the observed lid structure separate from the umbrella label.
Why does my eye shape look different in the mirror and on camera?
The camera height, distance, lens, lighting, head rotation, expression, and makeup can all change visible lid height and corner position. A mirror also allows both eyes to move while scanning, whereas a photograph freezes one angle. Compare photos with the same setup instead of treating the mirror and selfie as equivalent references.
Can an eye shape detector determine my ethnicity or health?
No. Visible eye features vary within every population and overlap across populations. A photo-based eye-shape exercise cannot establish ethnicity, diagnose a medical condition, or determine whether treatment is needed.
What should I record if the left and right eyes do not match?
Record each side separately. State which axis differs, whether the difference appears in a neutral frame, and whether it survives one corrected retake. Sudden, painful, vision-related, or movement-related changes are outside this cosmetic test and need appropriate professional assessment.
The best eye shape detector gives you a confidence-marked evidence ledger for four visible axes. It does not reward a forced label, and it never turns an imperfect photo into a medical conclusion.