
Separate the length ratio from the visible width path, then keep oval-like, oblong-like, mixed, and unresolved outcomes distinct. Open the detector
oval vs oblong face shape
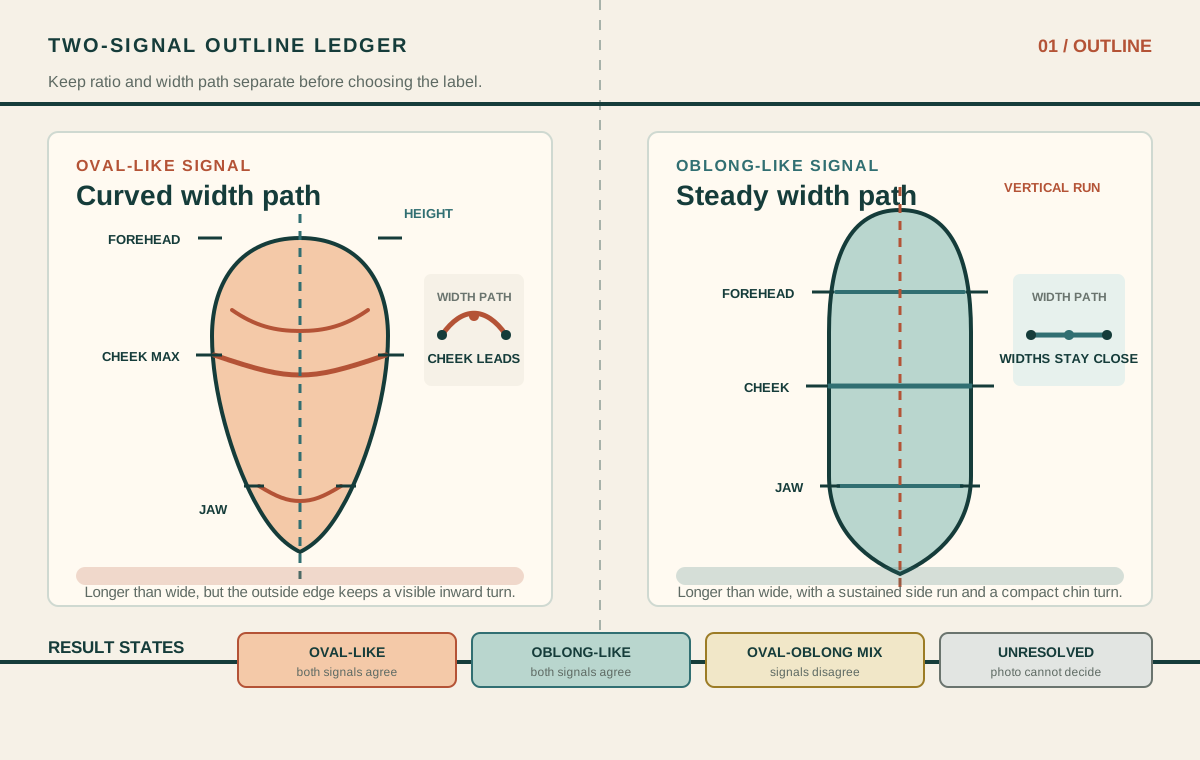
An oval vs oblong face shape comparison should not be decided by length alone. Both shapes are usually longer than they are wide. An oval-like face has a curved width path: the cheekbones are the widest visible zone, and the outline tapers toward a softer jaw. An oblong-like face keeps a steadier width from forehead through cheek and jaw while the vertical sides look more parallel. Use a level, undistorted photo and read the ratio and the outline separately. If the two signals disagree, call it an oval-oblong mix or unresolved instead of forcing one label.
Why one length-to-width ratio cannot settle the comparison
A face-height divided by face-width calculation can support a description, but it cannot identify the outline by itself. Public guides disagree on where an oval range stops and an oblong range starts. During this page's research, one accessible guide placed the transition much lower than another. A third guide argued that the width path matters more than total length, while another used a substantially higher ratio before naming an oblong face.
These are published claims, not one harmonized standard. A major reason is that the pages can use different landmarks for the top of the face, different points for width, and different thresholds. Hairline position adds another problem because the hairline can be covered, receding, styled, or inferred from a different part of the forehead. A precise-looking ratio can therefore hide judgment at its endpoints.
The practical answer is not to reject measurement. It is to keep measurement as one signal and inspect the width path as another. If you already use the [face shape detector](/face-shape-detector), preserve its height and width numbers, then compare those numbers with the visible outline before choosing a name.
Start with an outline-only photo
The first task is to make the outline worth reading. A phone held close to the face can enlarge the nose and center of the forehead while making the outer cheek and ear area look narrower. A low or high camera changes the apparent length of the lower face. A small head turn can make one side straighter than the other.
Use this setup:
- face the lens with the nose centered and both sides of the jaw visible;
- hold the camera near eye level and keep it vertical;
- use relaxed front light so neither side disappears into shadow;
- keep hair away from the temple, cheek, jaw, and chin outline;
- use a neutral expression with the lips closed;
- turn off lens effects and beauty filters that change the outer face;
- leave space around the head so the outline does not touch the crop.
The photo passes only when the left and right side paths can be compared. If one side is hidden, mark that side unresolved. Do not average a clear left side with a guessed right side and present the result as a complete shape.
Mark four useful lines
Use four lines to create a small evidence map. They do not need to be perfect measurements from a clinical system. They need to be visible, repeatable, and recorded in the same order.
| Line | What it marks | Why it matters |
|---|---|---|
| Face height | The upper face boundary to the chin | Shows vertical dominance, but becomes unreliable when the hairline is hidden |
| Forehead width | The visible outer temple line below the hairline | Starts the width path |
| Cheek width | The widest visible point around the cheekbones | Shows whether the cheek zone leads the outline |
| Jaw width | The outer lower jaw before the chin curve | Shows whether the lower outline stays broad or tapers |
Write visible, partly hidden, or inferred beside each line. If the upper boundary is inferred, the height ratio is provisional even when the calculation is mathematically correct. The width comparison can remain useful because all three width lines still come from the same photograph.
Read the width path instead of hunting for a cutoff
Place the forehead, cheek, and jaw widths in order. Then ask how the outside edge travels between them.
An oval-like width path usually has a soft progression. The cheek line leads, the forehead is slightly quieter, and the outline moves inward toward a rounded jaw. There can still be a short straight segment near the jaw. The key is that the widths do not look almost identical all the way down.
An oblong-like width path stays steadier. Forehead, cheek, and jaw look closer in width, and the sides drop with less inward movement. The lower face may still narrow toward the chin, but the main side line keeps a long, upright run.
A mixed width path is common. A face can have similar widths at the forehead and cheek, then taper clearly near the jaw. Another can have a cheek-led oval upper face and a long, straight lower outline. Call that mixed until one better photo makes one pattern stronger.
Do not use the cheekbone alone. High cheekbones are not a synonym for oval, and a soft jaw is not enough to make a face oval. Read the transition as a path.
Read where the outline turns
The location of the strongest turn adds a second outline signal. On an oval-like face, the visible bend is often distributed through the lower cheek and jaw. On an oblong-like face, the side stays vertical for longer and the turn becomes concentrated closer to the chin.
Compare the left and right turn points on a level image. Also compare where the turn begins relative to the mouth and jaw angle. This is not a universal rule with fixed landmark coordinates. It is a consistency check: a long face with a low, curved turn reads more oval-like, while a long face whose sides remain parallel into a compact chin turn reads more oblong-like.
If the turn point changes after you lower the camera from above eye level, the first observation was camera-sensitive. Keep the first photo, make one correction, and compare the same point instead of averaging two different camera angles.
Use two independent signals
The useful record has two columns:
| Signal | Oval direction | Oblong direction |
|---|---|---|
| Width path | Cheek zone leads and the outer line tapers inward | Forehead, cheek, and jaw stay comparatively even |
| Vertical path | The face is longer than wide, but the turn is distributed through the lower outline | The vertical side run is sustained and the chin turn looks compact |
Do not let one strong signal erase the other. A cheek-led upper face does not cancel a long, parallel lower half. A softer jaw does not cancel width continuity across all three zones. The label becomes more credible when both rows point the same way.
This two-signal order also prevents the most common selfie mistake: measuring one wide or narrow point and then selecting the word that feels most familiar. The [face shape chart](/face-shape-chart) can show the full set of labels, but this comparison should stay focused on the oval-oblong boundary.
Keep four possible outcomes
The final record should allow four results:
- Oval-like: the width path is cheek-led, the outline tapers inward, and the lower turn is distributed enough to match the oval direction.
- Oblong-like: the widths remain comparatively even, the side path stays upright, and the vertical run dominates both rows.
- Oval-oblong mix: one row points oval and the other points oblong after the photo gate was passed.
- Unresolved: a landmark is hidden, the camera angle distorts the outline, or the two sides cannot be compared.
A mix is not an error. It describes the evidence more accurately than forcing a borderline face into a category that requires evidence it does not have. The same is true of unresolved. A confident label built on an obscured hairline or turned jaw is less reproducible than a clearly recorded uncertainty.
Why the shape name can change in a selfie
The face outline is a projection of a three-dimensional form. A phone can change that projection with distance, height, and lens choice. Moving the camera closer enlarges the center of the image and can make the face look narrower or more tapered. Tilting the chin upward exposes more lower face and neck; tilting it down compresses the visible lower outline. Hair against the cheek can erase the width path completely.
Lighting can create the same problem. A shadow along one jaw can look like a taper even when the illuminated outline is straighter. A bright cheek can pull attention to the widest point and make an oblong width path look more oval. These are changes in the evidence, not discoveries about the face.
For that reason, do not compare a close selfie with a distant mirror view and treat the result as a stable classification. Compare photographs made under controlled, similar conditions. The question is whether the width path and vertical path survive a fair setup.
Retake once with one controlled change
If the first photo passes the setup gate but leaves a borderline result, make one retake. Change one condition only:
- move from slightly above eye level to true eye level;
- center a small head turn without changing the camera height;
- move one hair strand away from the widest cheek or jaw line;
- replace side light with even front light;
- increase camera distance without changing the crop below the chin.
Keep both images and compare the same four lines. If the oval or oblong direction remains similar, the observation is more repeatable. If only one signal changes, mark the result photo-sensitive and keep both versions. If the hairline remains hidden in both images, do not promote a provisional height ratio into a confident cutoff result.
Separate the comparison from styling advice
Once the shape evidence is recorded, styling becomes a separate question. For an oval-like result, an [oval haircut guide](/haircuts-for-oval-face-shape) or [glasses guide for oval faces](/glasses-for-oval-face-shape) may be a useful next step. For an oblong-like result, compare the [oblong hairstyle guide](/oblong-face-hairstyles) and [glasses guide for oblong faces](/glasses-for-oblong-face-shape) without assuming every recommendation will fit the same person.
Do not change the shape label because a styling rule requires it. If a page assumes a hard boundary that your evidence does not support, keep the mixed or unresolved note. A useful style decision should still pass its own fit checks for proportion, comfort, hair behavior, frame width, and movement.
Continue with related face measurements
Use the [what is my face shape](/what-is-my-face-shape) guide if the oval-oblong comparison is your first label. The [face symmetry test](/face-symmetry-test) and [facial thirds test](/facial-thirds-test) answer different measurement questions and should not be substituted for an outline comparison. If your main concern is whether a frame looks balanced, move to the [oblong-face glasses](/glasses-for-oblong-face-shape) or [oval-face glasses](/glasses-for-oval-face-shape) checklist after recording the outline.
Oval vs oblong face shape questions
What is the main difference between an oval and oblong face?
The main difference is not length alone. Oval-like outlines usually make the cheek zone prominent and then curve inward toward the jaw. Oblong-like outlines keep the forehead, cheek, and jaw widths more even while the long side run stays comparatively straight.
Is an oblong face always longer than an oval face?
Not in a way that gives one dependable cutoff. Both are generally longer than wide, and published guides use different landmarks and thresholds. A strong visible vertical run plus steady width is more useful than selecting a single length number without checking the source and the outline.
Can a face be both oval and oblong?
Yes, a mixed description is possible when the width path and vertical path point in different directions. One row can suggest a cheek-led oval shape while the other shows a long, parallel lower outline. Keep the mix unless a better-controlled photo makes one signal clearly stronger.
Why do different face-shape quizzes give different answers?
They can use different hairline and width landmarks, different cutoffs, different camera assumptions, and different rules for borderline cases. Some tools force every face into one class. A reproducible comparison should show the photo conditions and allow mixed or unresolved evidence.
Does this test decide attractiveness or health?
No. It is a descriptive photo exercise about visible outline patterns. It does not rate appearance, diagnose a condition, or determine whether a cosmetic treatment is appropriate. A sudden or painful change in facial shape or movement needs appropriate professional assessment.
The best oval vs oblong face shape result is not the most precise-looking number. It is the result that keeps the four lines visible, checks the width path and vertical path independently, and admits when the photo cannot support a confident distinction.